


Starlink Mini Adjustable Roof Mount with Four Magnetic Feet
Original price was: $99.99.$89.99Current price is: $89.99.
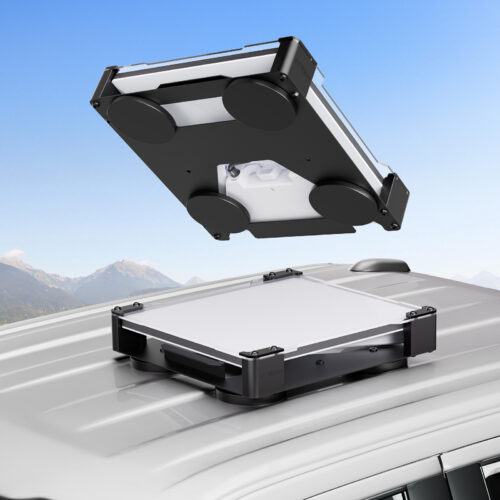
The Starlink Mini Adjustable Roof Mount uses four 66 mm magnetic feet that move between predrilled mounting holes. Match the feet to flat contact areas on a suitable steel roof, then secure the Mini in the aluminum alloy cradle with the supplied locking screws. The cradle has a fixed 8° tilt.
| Brand / Manufacturer | STARGEAR |
|---|---|
| Model / Manufacturer Part Number | SG-MINI-4LegMount-ADJ-BK |
| Compatible Device | Starlink Mini |
| Version | Adjustable Mount |
| Color | Black frame with gray cradle |
| Material | Aluminum alloy |
| Magnetic Feet | 4 round feet, 66 mm diameter each |
| Foot Adjustment | Repositionable between predrilled mounting holes |
| Direct Mounting Surface | Suitable magnetic steel with four flat contact areas |
| Cradle Tilt | Fixed 8° relative to the mounting surface |
| Included Components | Mount frame with cradle, four magnetic feet, dish locking screws and a screwdriver |
| Listed Item Dimensions (L × W × H) | 12 × 9 × 1.8 in |
| Unit Count | 1 kit |
Starlink Mini Adjustable Roof Mount with Repositionable Feet
The Starlink Mini Adjustable Roof Mount lets you move its four magnetic feet between predrilled mounting holes. Position them to match usable flat steel areas before installing the Mini.
This Starlink Mini adjustable magnetic mount has a black frame and gray dish cradle. The adjustable magnet positions help when a roof rib, seam or trim piece sits under one of the standard contact points.
Map the Flat Areas on Your Roof
Confirm that the roof panel is suitable steel that attracts magnets. Look for four flat contact areas that let the frame sit evenly and give the dish a clear view of the sky.
On a ribbed roof, use the flat sections beside the ribs. Check that each area is wide enough for a complete 66 mm foot before choosing your hole positions.
On a smooth roof, look for a clear area away from seams, trim and antennas. Leave room for the dish edge and the power cable.
Set the Foot Positions Before Mounting the Mini
With the frame off the vehicle, follow the installation guide to move the feet to the selected holes. Tighten the hardware before you test the fit on the roof.
Place the Starlink Mini Adjustable Roof Mount on the chosen panel and check that all four feet sit flush. If a foot tips or the frame rocks, change the layout or mounting spot.
For aluminum or glass, use a separately sold mounting system suited to the surface. If that system uses compatible steel contact plates, match their positions to all four feet.
Connect the Cable and Lock the Cradle
Route your power cable through the bracket opening before seating the Mini. Leave enough slack to connect it without putting tension on the port.
Seat the Mini in the cradle and snug the dish locking screws with the supplied screwdriver. Avoid overtightening and check that the dish is seated evenly before use.
The Starlink Mini Adjustable Roof Mount holds the dish at a fixed 8° tilt relative to the mounting surface. Keep the raised edge clear of nearby hardware or roof fittings.
Check Contact When You Change Locations
Recheck the roof layout if you transfer the mount to another vehicle. A foot position that works on one roof may land on a rib or seam on the next.
Why You’ll Love It
- Predrilled holes let you reposition all four magnetic feet.
- Each 66 mm foot needs a flat area for full contact.
- Tool-operated locking screws retain the Mini in its cradle.
- Fixed 8° cradle tilt gives a consistent dish angle.
- The kit includes the four feet and locking tool.
Use the Starlink Mini Adjustable Roof Mount while parked or docked. The vehicle images illustrate placement. Remove the dish and mount before travel.


FAQ
Q1: What is adjustable on this mount?
A1: The Starlink Mini Adjustable Roof Mount lets you move the feet between predrilled holes. The dish cradle stays at its built-in 8° tilt.
Q2: Will it fit my ribbed roof?
A2: It can fit if the available hole positions let all four feet sit flat on suitable steel. Compare the hole layout with your roof first.
Q3: Can I attach it directly to aluminum or glass?
A3: Direct attachment is for suitable magnetic steel. For aluminum or glass, use a compatible mounting system or steel contact plates suited to the surface.
Q4: Do I need to buy the magnets or locking tool separately?
A4: The Starlink Mini Adjustable Roof Mount includes four magnetic feet, locking screws and a screwdriver. Supply your own Mini, power cable and power source.
Q5: How do I take the Mini off the mount?
A5: While parked or docked, loosen the cradle screws with the supplied tool. Support the dish while disconnecting power, then lift it out of the cradle.
1 review for Starlink Mini Adjustable Roof Mount with Four Magnetic Feet
Related products


Starlink Mini Adjustable Clamp Mount Kit with Silicone Case
$109.99
Select options
This product has multiple variants. The options may be chosen on the product page


Chet –
Excellent goods from you, man. I’ve understand your stuff previous to and you are just extremely
great. I really like what you’ve acquired here, really like what you are
saying and the way in which you say it. You make it enjoyable
and you still take care of to keep it sensible. I cant wait to
read far more from you. This is really a tremendous web site.